|
|
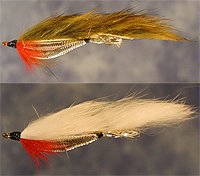
If you were traveling to Alaska, limited to one pattern and it's variations -- the Zonker would be tough to beat. It's a well-known, highly effective baitfish pattern in natural colors, but it's also a dynamite attractor when tied with fluorescence and flash. The pattern incorporates the elements of profile, attractiveness and movement that make it irresistible to fish, and from a fly-tyers standpoint it's highly modifiable. Various body and wing materials can be used to create endless combinations, and the weighted belly provides an effective hook-up design with the necessary weight to reach the toughest lies.
|
Materials:
- Hooks - Sizes 2 - 6 long shank streamer, e.g. Mustad 9674
- Thread - Heavy black, e.g. Danville Monocord or Flymaster Plus.
- Underbody material - Lead tape or tungsten sheets. ( Zonker Tape )
- Overbody material Metallic Mylar tubing, Super Pearlescent Mylar Tubing, Glimmer Braid, EEL Glimmer Braid, Holographic Tubing, Everglow Tubing.
- Collar - Rabbit strip.
- Wing - Rabbit strip. ( Zonker strips )
|
TYING STEPS:
- Cut a 1/2 inch strip of lead tape and remove the paper backing to expose the adhesive. With the sticky-side down, place the strip lengthwise, approximately 1/4 inch back of the eye extending rearward, centered along the hook-shank. Bend lead downward, folding it over the shank until the sticky sides come together.
Note: for an inverted fly, fold the lead tape in the opposite direction of the hook point.
- Trim the lead to form a belly behind the eye with the material gradually tapering to meet the shank near the hook bend.
- Slip the braided Mylar tubing over the eye of the hook, working it past the body material toward the bend. Fray approximately 1/4 inch of the tubing and continue to pull it rearward until the frayed portion is extending past the bend of the hook forming part of the tail.
- With the un-cut roll of Mylar tubing still extending in front of the eye, make several tight wraps of thread behind the eye, then cut the tubing in front of the eye. Whip finish. Because the Mylar was cut in front of the eye, there will be remaining material that is covering the eye of the hook. This can be carefully trimmed to the thread wraps behind the eye.
- At the rear, place 3 or 4 wraps of thread over the Mylar just in front of the hook bend. With one hand pull the Mylar rearward, then make several more tight wraps with the other hand. This will serve to stretch the Mylar tightly over the underbody material and secure it at the tail. Whip finish using the hand method.
Note: At this point the body is formed and thread can be removed from the fly. Front and rear wraps can be permanently secured with cement.
- Cut a piece of stripped rabbit for the desired fly size (Generally 1 to 3 inches). With the hook point, pierce the skin-side of the rabbit strip at a point approximately 1/3 of the total length, then push the hook through and thread the strip upward onto the hook shank. The strip should be threaded onto the hook so the hair points toward the rear, and it should be positioned so it extends along the top of the hook with 2/3 of the material being forward.
- Secure the thread just behind the eye. Pull the rabbit strip firmly forward, then wrap with thread to secure behind the eye. Trim excess.
- Cut small clump of red rabbit and secure at throat. Whip finish.
Note: For added durability, Zap-A Gap, or super-glue can be added where the rabbit strip meets the body material near the hook bend.
Pattern tied by Brad Hanson
Photo by B. Hanson ©2003

|