This versatile nymph was developed by an innovative fly tyer named "Prince" and for decades has been one fo the most widely used and effective flies for trout and other species all over the world.
In Alaska it has become a familiar favorite for experienced flyfishers considering the proposition of nymphing for trout. The Prince's effectiveness may be attributed to an impressionistic profile and the use of peacock herl which lends an irridescent metallic glean found in so many natural insects.
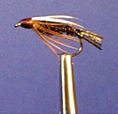
The distinguishing characteristic that sets the Prince Nymph apart from other similar flies is the white split wing of goose biot. This wing although not specifically imitative of the naturals has added an attractive quality to the fly that fish have found irrisistable at times. The traditional tail is also a split goose biot in brown but has been omitted and replaced with a herl tail in this particular pattern staying along the lines of the Zug-Bug, another highly effective peacock herl nymph. The other change in this pattern is the substitution of pheasant tail barbs for the sparse hackle legs typically found on the original. The pheasant tail barbs create a more prominent rigid leg than the hackles but may inhibit its ability to sink quickly if that's a priority.
The Prince has been included in this Alaska collection because it can be highly effective. As unique and different as flyfishing in Alaska can be, anglers shouldn't lose sight of the fact that these trout can often be taken using standard methods and patterns employed in other parts of the world.
TYING:
- Cover the hook shank from the eye to the bend with thread to form a
base.
- Tie in 3 strands of peacock herl where the bend starts leaving 1/4 " extending rearward to form the tail.
- Tie in a single strand of copper wire where the bend starts.
- Tie in 3 to 4 strands of peacock herl where the bend starts, run thread to hook eye, then wrap herl forward to a point 1/8" behind the eye and tie down.
- Wrap the copper wire forward going the opposite direction of the peacock herl and tie off behind the eye. (By wrapping over the herl with the wire it adds durability and a reflective rib.)
- Tie in 2 goose biots behind the eye extending along the top of the thorax to where the tail starts. The biots should spread slightly as they extend to the rear forming wings. The concave side of the biot should be facing down toward the thorax.
- Tie in a small bunch of pheasant tail barbs immediately behind the eye pointing forward then pull the barbs backward along the sides and wrap them down to form legs that extend toward the rear, ending just short of where the tail starts.
- Wrap just behind the eye to form the head then whip finish.
Field Notes: As wonderful a flytying material as peacock herl is, there's a downfall in that its relatively fragile and tends to break easily when encountered by toothy fish. Tying methods such as wrapping the herl around thread or wire to form a brush, or overwrapping the herl with wire should be incorporated in the interest of durability. It can be aggravating to have a successful fly destroyed one at a time by aggressive fish.
Pattern tied by Brad Hanson
Photo by B. Hanson ©1999