Alaska Flyfishing Online
Fly Tyer's Bench
Alaskan Fly Patterns Eggs & Flesh Flies

Brad Hanson's Alaskan Deep Six Egg
 

The flyfishing conditions in Alaska are as varied as its wildlife and scenery. Besides the challenge of matching a pattern to the appetite of your quarry, Alaska contains thousands of streams ranging from wadable creeks to big, deep rivers. And a flycaster must be prepared to cover all the bases, especially if venturing into the bush for an extended trip where a variety of species and water conditions will be tested.

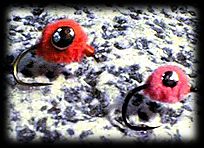
This egg pattern by Brad Hanson gives the big water angler an opportunity to fish deep runs which most of the time may be passed by. The only alternative to fishing these conditions with an egg is to load up your leader with split shot and start plunking - something even the most versatile flyangler has trouble accepting. The lead dumbbell eyes serve the purpose of much needed weight for these deep conditions. They also provide an additional degree of realism not achievable with a "chenille only" egg pattern. The eyes offer a bit of glint to the egg, much as the membrane of real eggs and they replicate the oil globule found in freshly spawned eggs.

This fly can be tied in many different colors and sizes. Matching the dumbbell eye size to the final size of the egg will produce the most realistic presentation.

1. Body - chenille
2. Thread - Match egg color
3. Hook - #6 - #10 egg hook
4. Weight - lead dumbbell eyes

TYING:

  1. Apply a thread base to the hook shank halfway from the eye to the start of the bend.

  2. Position the dumbbell eyes atop the hook shank, behind the hook eye at a distance to accommodate the preferred egg size. (The finished egg should sit just behind the hook eye.) While holding the dumbbell eyes in position with one hand make 6 to 8 wraps of thread over the center of the eyes with the other. While making these initial wraps of thread allow the dumbbell eye to cock with the cross piece of the lead eyes becoming semi-aligned with the hook shank. It will have the appearance of the eyes sitting on the shank crooked with one eye being forward of the other.

  3. Forcefully push the dumbbell eyes into a perpendicular position at a 90 degree angle to the shank. The wraps that placed the eyes in a crooked position will resist this step but by forcing the eyes into a proper alignment it adds essential increased thread tension on the eyes to assure they stay in place without twisting on hook shank.
    When the eyes are forced into position then make several wraps in the opposite direction of the wraps in step two to prevent it from returning to an offset position, then make several more wraps in a figure eight fashion alternating directions. Wrap underneath the eye pulling the figure eight wraps tightly into the base for added security.

  4. Tie in the chenille along the top of the dumbbell eyes. Leave the chenille in the package if possible and just pull out a little at a time as you wrap to prevent wasting material.
    Wrap the chenille in a figure eight fashion between the dumbbell eyes using them as a cradle adding a wrap behind and in front of the eyes to completely cover the gaps. This step takes a little experimentation and occasional adjustment of the materials to assure a symmetrical egg is formed. Finish this step with the wrap in front of the egg and tie off the chenille immediately behind the hook eye.

  5. Whip finish.

The size of the dumbbell eye chosen depends on the size of the egg and the desired weight of the fly.

Pattern by Brad Hanson
Photo by B. Hanson ©1999

AFO Home
Alaska Flyfishing Online
All Content Copyright ©1996-2003
Visual Media Design, Alaska Outdoor Journal, Alaska Flyfishing Online
All Rights Reserved
Webmaster
AOJ Home
Alaska Outdoor Journal